Issuing Refunds
This guide explains how to issue a refund for a transit fare through the Fare Adjustment Tool.
Overview
Refunds are issued from the Transaction Detail page. You can access this page from either:
- The Transactions list (by clicking "View" on a transaction)
- A Customer's transaction history
Accessing the Transaction Detail Page
From the Transactions List
- Navigate to Transactions in the left menu
- Scroll right in the table to find the Actions column
- Click View next to the transaction you want to refund
From a Customer's Profile
- Navigate to Customers in the left menu
- Search for and select the customer
- Go to the Transactions tab
- Click View next to the transaction
Transaction Detail Page
The Transaction Detail page shows comprehensive information about a single journey:
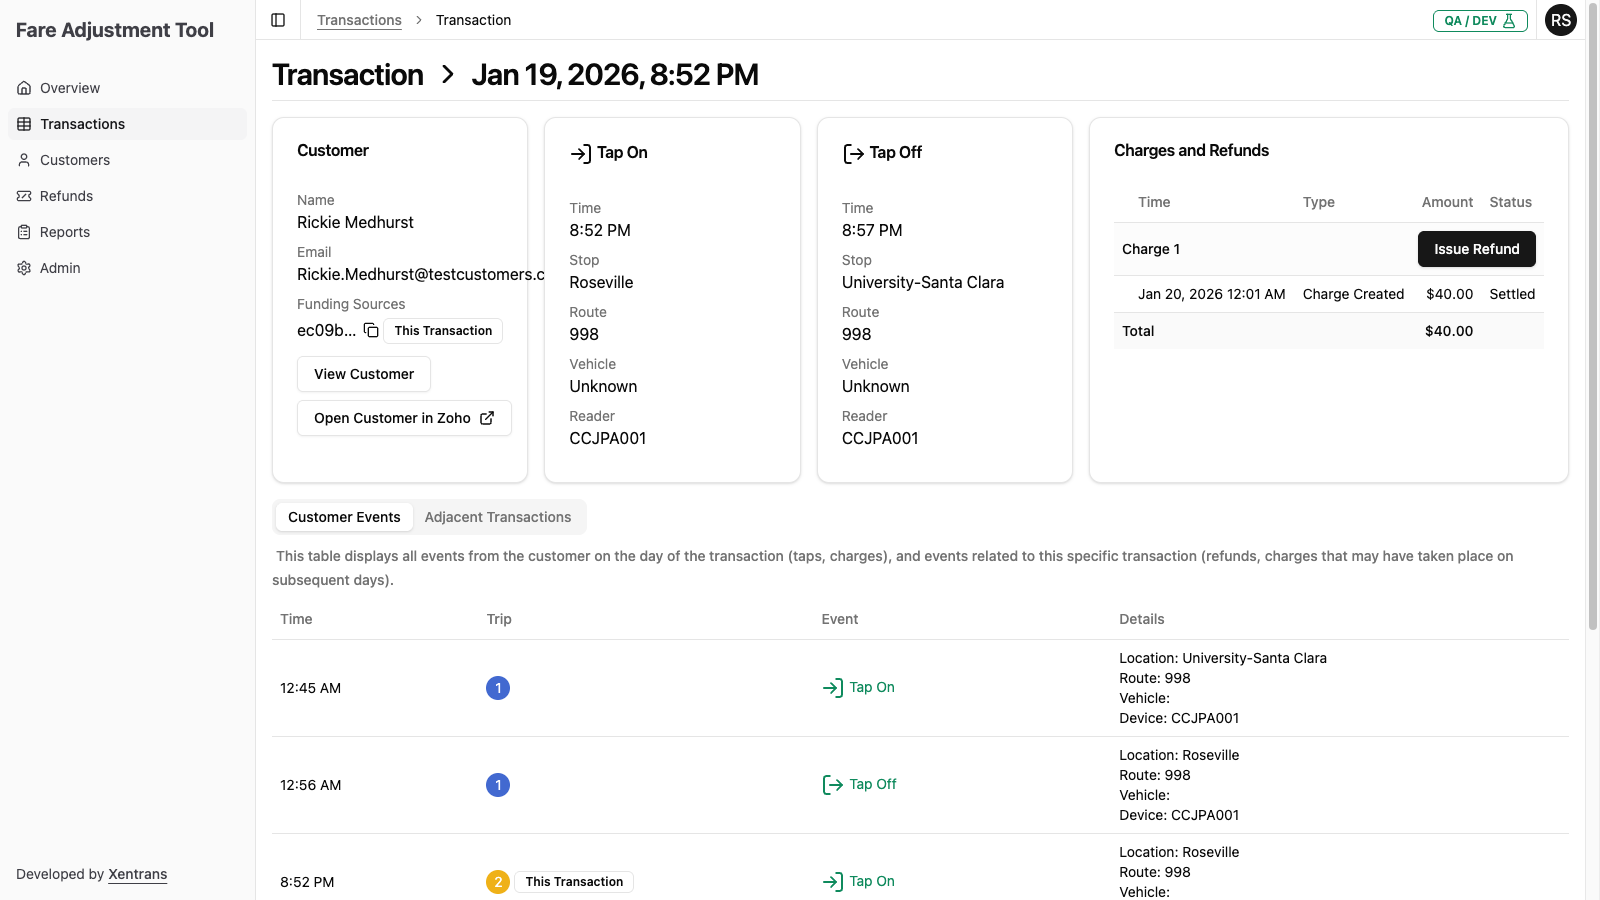
Customer Information
- Customer name and email
- Funding Source ID(s) associated with this transaction
- Links to view the customer profile or open in Zoho CRM
Tap On / Tap Off Details
- Time of each tap event
- Stop/station location
- Route number
- Vehicle information
- Reader device ID
Charges and Refunds Card
This card on the right side shows:
- Charge rows: Each charge with date/time, "Charge Created" type, amount, and settlement status (e.g., "Settled")
- Refund rows: Each refund with date/time, amount, and status (e.g., "COMPLETE")
- Refund details include: Type (User Requested/Proactive), Reason, Notes, and "Issued by" name
- A "?" button to view more details about the refund
- Issue Refund button: Click to initiate a new refund for this charge
- Total: The remaining balance after all refunds (e.g., "$0.00" if fully refunded)
Customer Events Tab
A timeline showing all events from the customer on the day of the transaction, plus events related to this specific transaction (like refunds that may have occurred on subsequent days).
The table includes columns:
- Time: When the event occurred
- Trip: Shows "This Transaction" badge for events related to the current transaction
- Event: The type of event (Tap On, Tap Off, Charge Created, Charge Settled, Refund)
- Details: Additional information like location, route, vehicle, device, or amount
Adjacent Transactions Tab
Shows other transactions from the same customer around the same time period, which can be helpful for understanding the customer's travel pattern and verifying refund requests.
Issuing a Refund
Step 1: Click "Issue Refund"
On the Transaction Detail page, locate the Charges and Refunds card and click the Issue Refund button.
Note: The button will be disabled if the charge has already been fully refunded.
Step 2: Complete the Refund Form
The refund dialog will appear with the following fields:
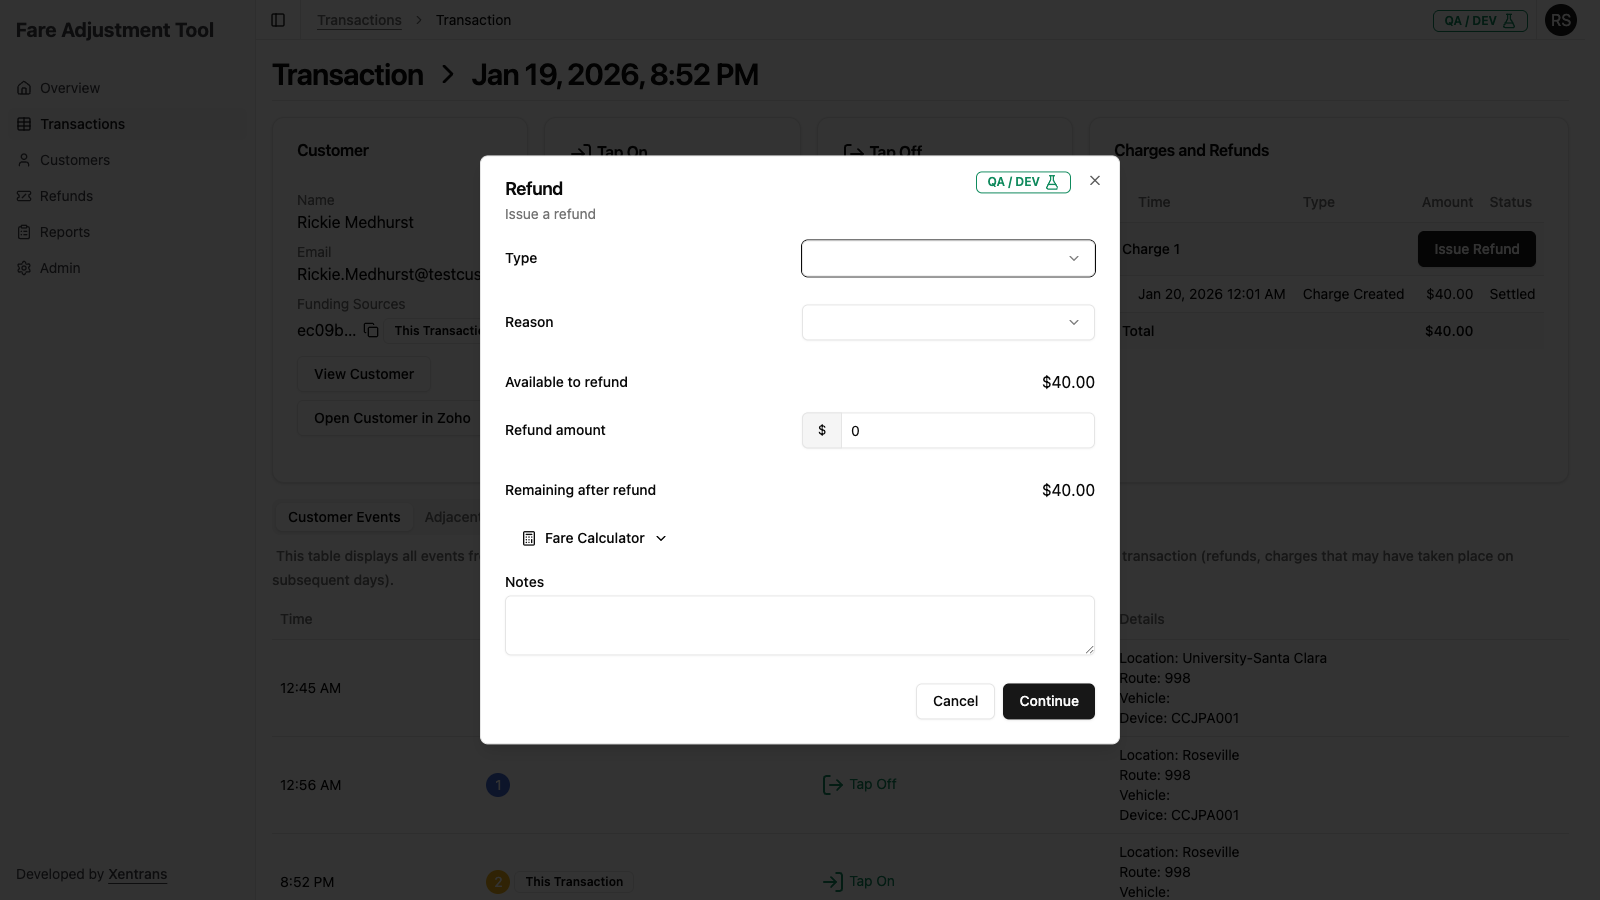
Type (Required)
Select the refund type:
| Type | When to Use |
|---|---|
| User Requested | Customer contacted support requesting a refund |
| Proactive | Staff identified an issue and is initiating the refund without customer contact |
Reason (Required)
Select one or more reasons for the refund. Multiple reasons can be selected if applicable. The reason dropdown includes a search box to help you find the right option.
Available reasons include:
- Wrong train number
- No train number
- Tap out registered as tap in
- Location error
- Unclear
Available to Refund
This displays the maximum amount that can be refunded for this charge. It accounts for:
- The original charge amount
- Any previous refunds already processed
- Any pending refund requests
Refund Amount (Required)
Enter the dollar amount to refund:
- Cannot exceed the "Available to refund" amount
- Enter the value in dollars (e.g., "5.00" for five dollars)
Remaining After Refund
This automatically calculates and displays what will remain on the charge after your refund is processed.
Fare Calculator (Optional)
Click Fare Calculator to expand a helpful tool:
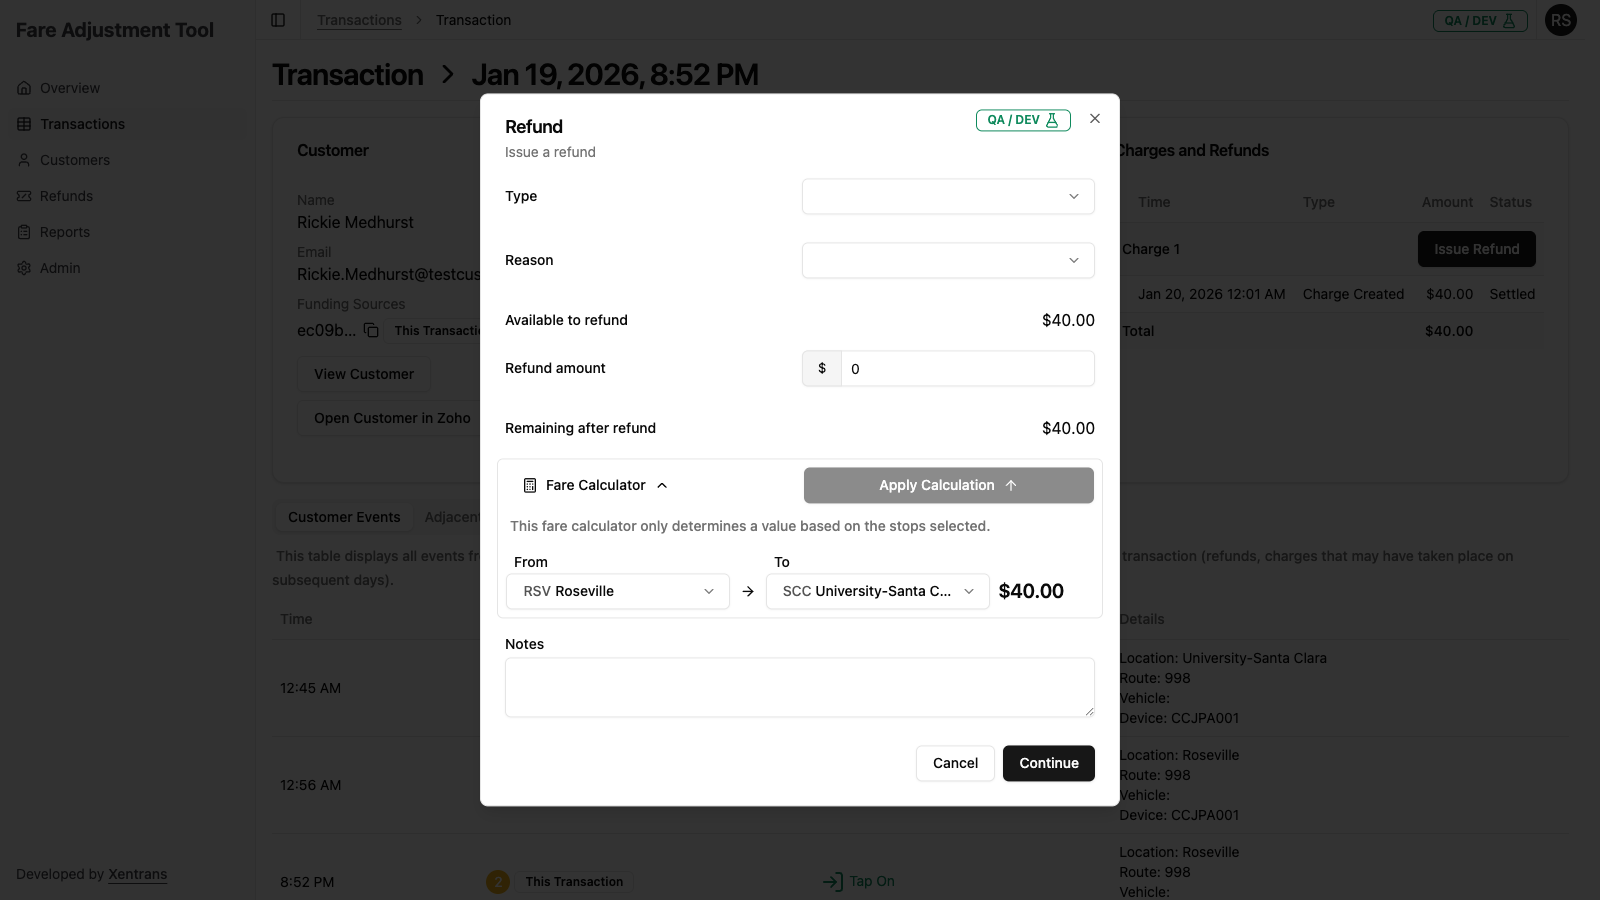
- The calculator pre-fills with the transaction's tap-on and tap-off locations
- You can adjust the locations to calculate what the fare should have been
- Click Apply Calculation to automatically set the refund amount to the difference between what was charged and what should have been charged
This is useful for incomplete transactions where you need to calculate the correct fare for a shorter journey.
Notes (Required)
Enter notes explaining the reason for the refund. This information:
- Is stored with the refund request
- Helps with auditing and reporting
- Should include relevant context for future reference
Step 3: Review and Continue
Click Continue to proceed to the confirmation step.
Step 4: Confirm the Refund
The confirmation dialog displays with the message "Are you sure you want to issue this refund?" and a summary:
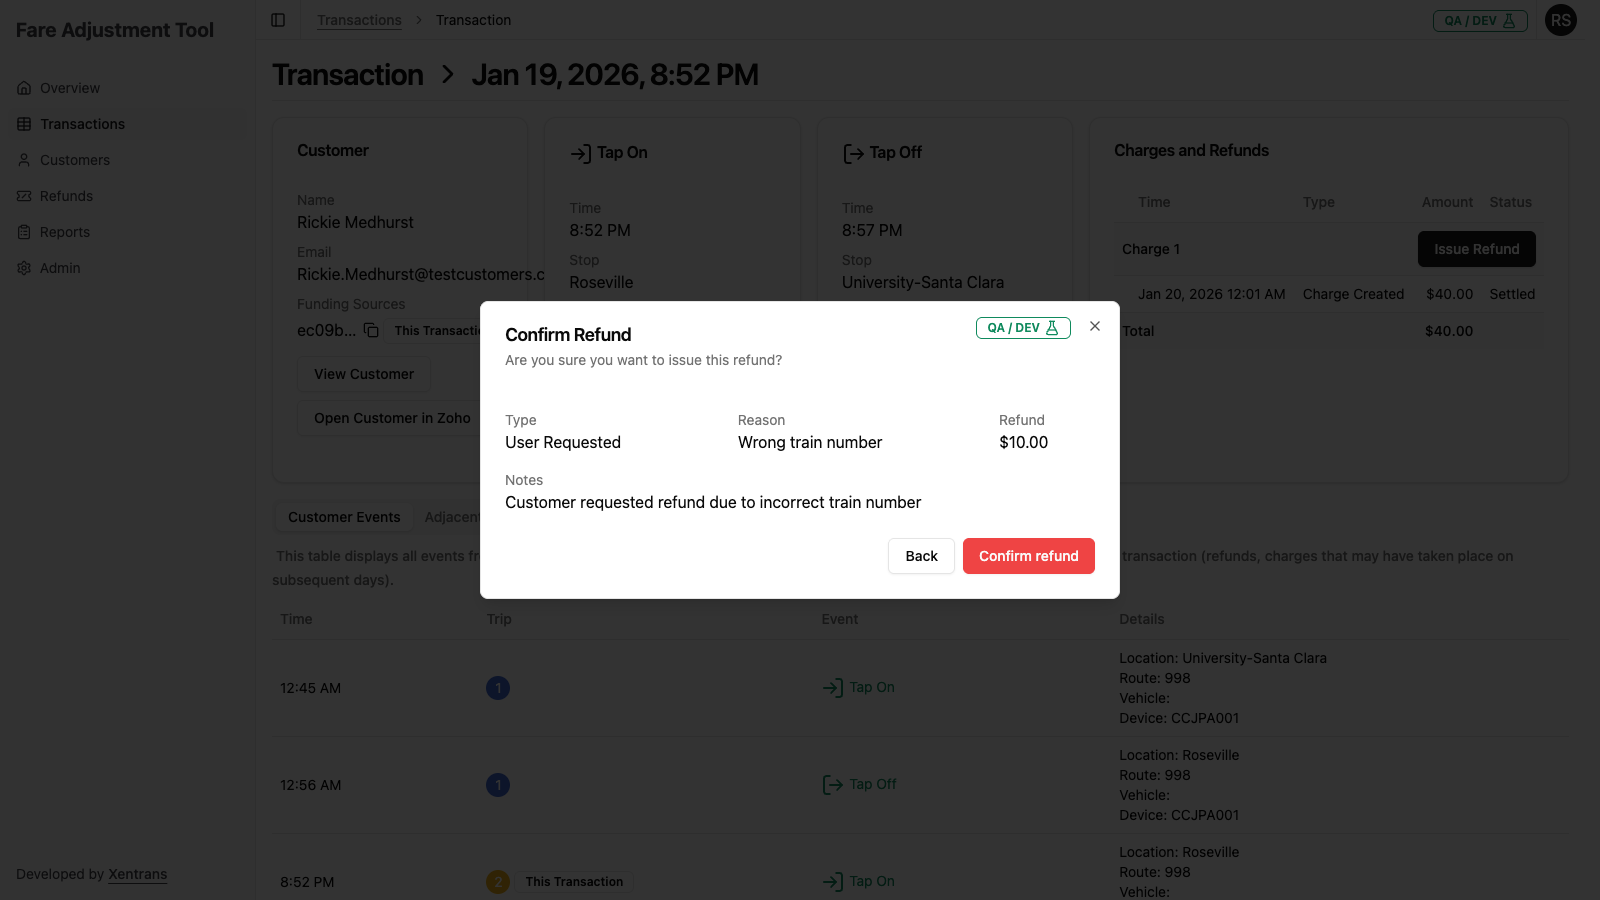
| Field | Description |
|---|---|
| Type | The refund type you selected |
| Reason | The reason(s) you selected |
| Refund | The refund amount |
| Notes | The notes you entered |
You have two options:
- Click Back to return to the form and make changes
- Click Confirm refund (red button) to submit the refund request
Step 5: Refund Complete
After submission, you'll see a confirmation that the refund has been initiated.
The refund will:
- Appear in the Charges and Refunds card with a "Pending" or "Created" status
- Be processed by the payment system
- Update to "Accepted" once successfully processed
Refund Statuses
After submitting a refund, you can track its progress:
| Status | Description |
|---|---|
| Created | Refund request has been submitted |
| Pending | Refund is being processed by the payment system |
| Accepted | Refund was successfully processed (shown with green badge) |
| Rejected | Refund was rejected by the payment system |
| Error | An error occurred during processing |
Viewing Refund History
After a refund is issued, you can view it in several places:
- Transaction Detail Page - In the Charges and Refunds card
- Customer Profile - Under the Refunds tab
- Refunds Page - In the global refund list
- Reports - By generating a refund report
Best Practices
Before Issuing a Refund
- Verify the transaction - Confirm you're looking at the correct transaction
- Check for existing refunds - Review if any refunds have already been processed
- Calculate the correct amount - Use the Fare Calculator for incomplete transactions
- Document thoroughly - Provide clear notes for audit purposes
Choosing the Right Type
- Use User Requested when responding to customer inquiries or complaints
- Use Proactive when you identify issues through transaction monitoring
Writing Good Notes
Include:
- Why the refund is being issued
- How the refund amount was determined
- Any relevant ticket or case numbers
- Customer contact details if applicable
Troubleshooting
"Issue Refund" Button is Disabled
This means there's no amount available to refund. Check if:
- The charge has already been fully refunded
- There are pending refund requests that account for the remaining balance
Refund Shows "ERROR" Status
If a refund fails:
- Note the error details
- Contact your system administrator
- You may need to re-attempt the refund
Cannot Find the Transaction
Try:
- Expanding the date range on the Transactions page
- Searching for the customer by funding source ID
- Checking the customer's transaction history directly